GIMP 3.2 Release Notes
Introduction
After a year of work since the first version of GIMP 3.0, we’re proud to release GIMP 3.2! In addition to our main roadmap items of “non-destructive layers”, this release is packed with all sorts of new features, UX/UI refinements, and stability improvements.
- Non-destructive Layers
- New MyPaint Brushes
- Text Editor Improvements
- Overwrite Paint Mode
- Non-Destructive Filter Updates
- Usability Improvements
- New Image and Palette Format Support
- Stability and Regression Fixes
- Additional Features and Changes
- For Script and Plug-in Developers
- End of 32-bit binaries distribution
- Translations
- Next Steps on the Roadmap
- Download GIMP 3.2
- Reporting Bugs
- Contributing to and Supporting GIMP
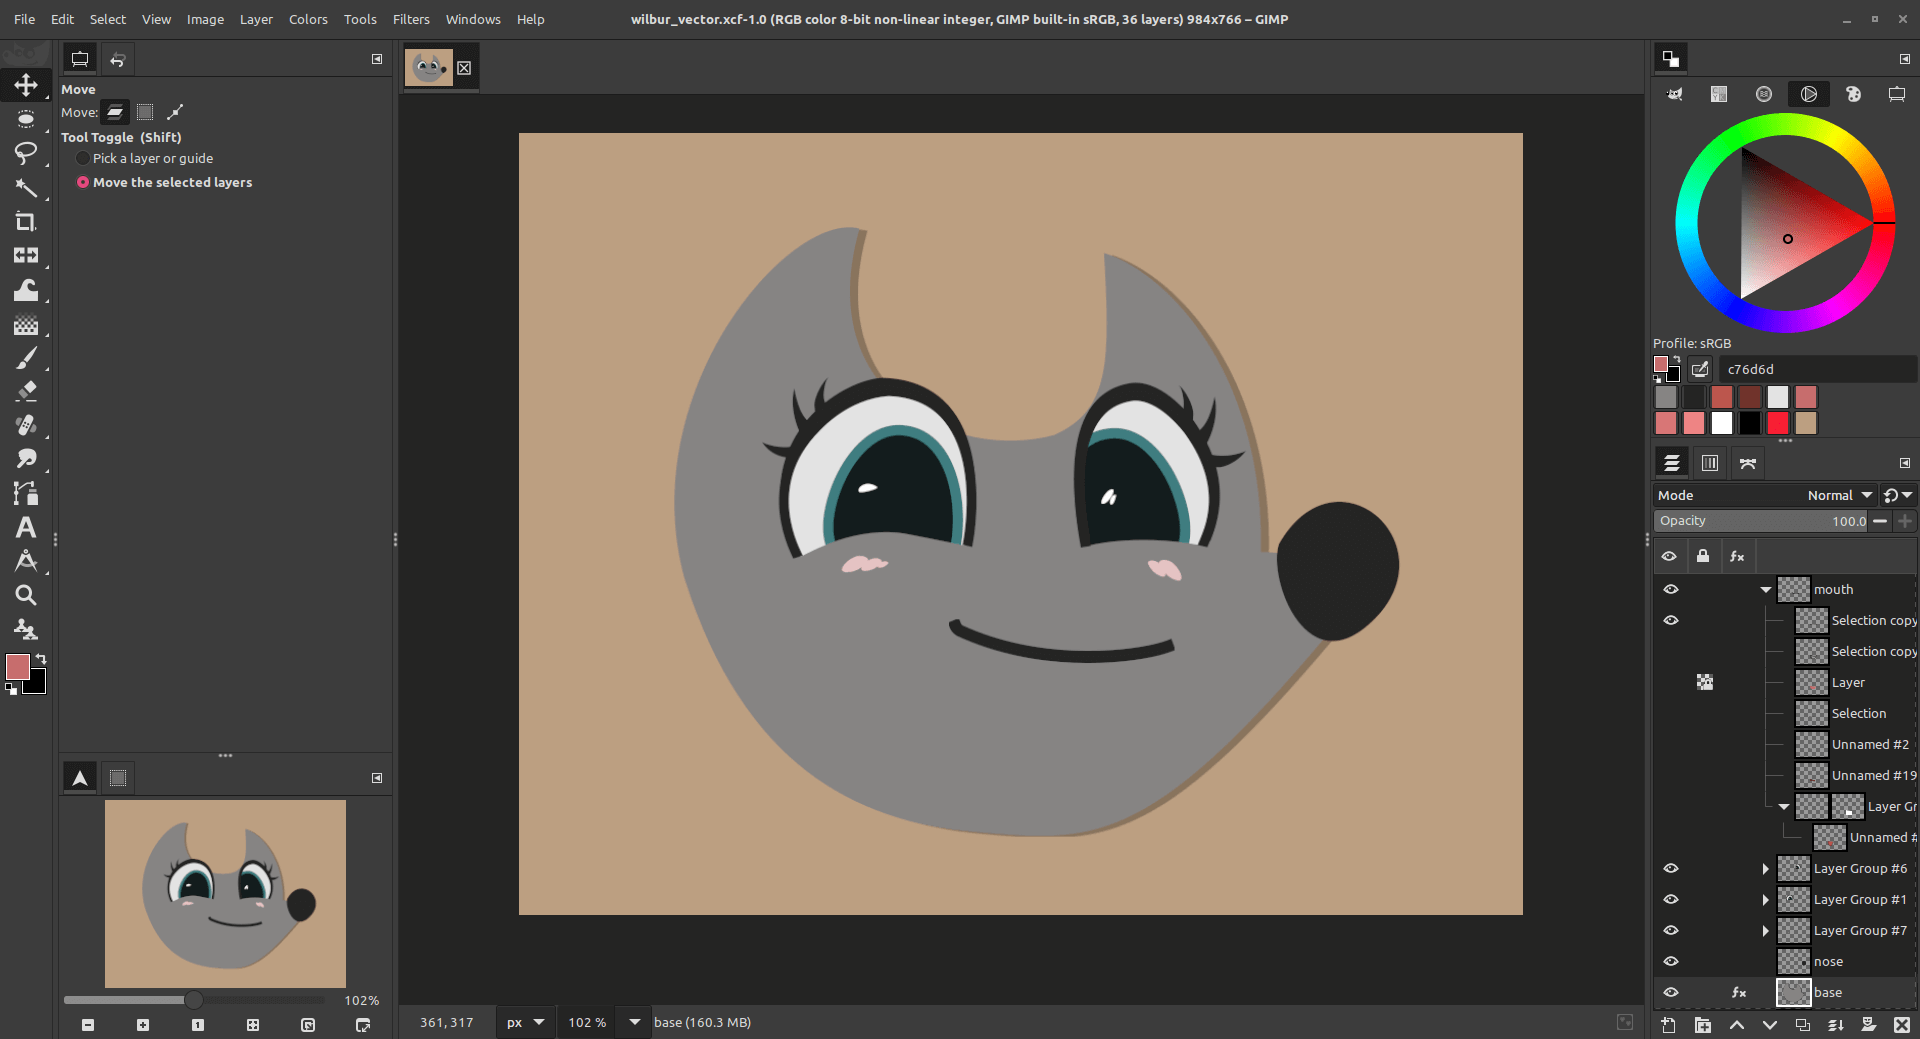
Non-destructive Layers
The main focus of the 3.2 roadmap was “non-destructive layers”. A non-destructive layer is one that you can go back and edit
later without having to use Undo, rather like non-destructive filters. GIMP already had one type of these layers – the
well-known text layers. As detailed below, we’ve added two new types, Link Layers and Vector Layers.
Due to this work, we’ve set up a new workflow for all three layer types. Over the years, there have been a number of reports about people losing the ability to edit their text because they accidentally painted over it and turned it into a raster layer. Now each non-destructive layer type has a Rasterize option in the Layer menu that you must toggle before doing destructive edits like painting, or merging filters.
This process can be reverted as well, with the Revert Rasterize option in the Layer menu, which will clear all of your destructive edits.
Link Layers
Link Layers allow you to “link” an external image as part of a composition in GIMP. It functions similar to the “Linked Smart Object” concept from Photoshop. The Link Layer will automatically update if the external image is changed in another editor – for example, if you include a SVG logo as a Link Layer in GIMP, you can edit it in Inkscape and see the changes live in GIMP as well!
You can create a new Link Layer by choosing Open as Link Layer... in the File menu. You can change the image used at any time in the Layer Attributes dialog, which you can access by double-clicking the layer in the dock or by choosing Edit Layer Attributes... from the layer menu.
As with Text Layers and Vector Layers, you can Rasterize a Link Layer to allow destructive edits, and revert back to a link layer with Revert Rasterize.
Vector Layers
This release also features the long-awaited vector layers! The Path tool now lets you create a “path layer” with stroke and fill settings. You can easily change color/pattern and visibility of both, and you can further adjust the stroke line width and other properties. The shape of the vector layer also automatically updates whenever you adjust the path, and you can non-destructively rotate, scale, and transform it too! Like Text Layers, you can also drag and drop color and pattern swatches onto the Vector Layer to change its fill.
As with Text Layers and Link Layers, you can Rasterize a Vector Layer to allow destructive edits, and revert back to a vector layer with Revert Rasterize.
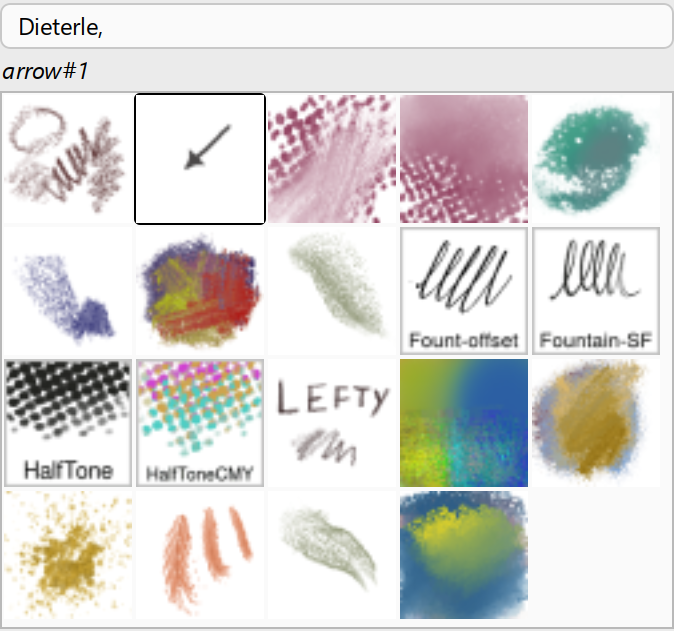
New MyPaint Brushes
In addition to GIMP’s own brush engine, you can also use the
MyPaint Brush tool and its assortment of brushes to paint on the canvas.
In GIMP 3.2, we updated this tool to use the newer Version 2 API. This upgrade adds 20 new brushes to the tool, including a
much-requested arrow brush. You can check them out in the Dieterle tag group.
The updated MyPaint Brush tool also takes into account your canvas zoom and rotation to provide more dynamic paint strokes. As one example, the direction of the stroke offsets will change based on how you have the canvas rotated. If your tablet stylus supports barrel rotation, this will also be used by the MyPaint Brush tool while painting.
There is also a new “Gain” slider in the MyPaint Brush options. This allows you to offset the strength of the pen pressure on the tablet, or to simulate it if you’re painting with a mouse.
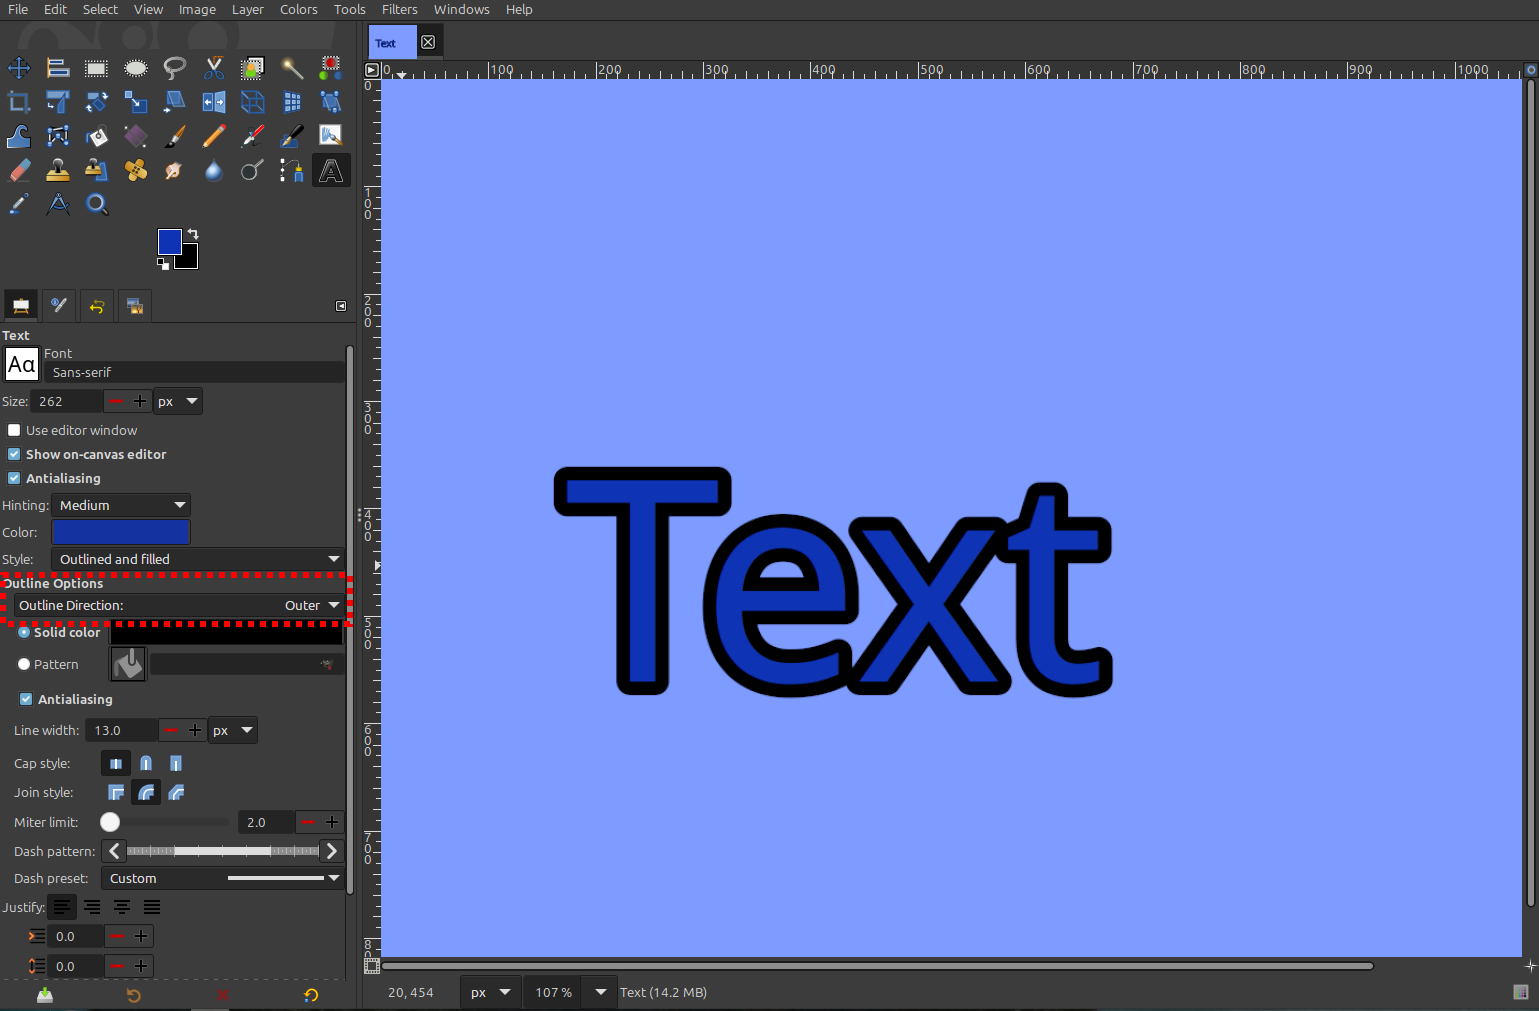
Text Editor Improvements
Our Text Editor has been the focus of several development projects to improve its usability and functionality. You can now drag the on-canvas text editor to move it out of the way when writing text.
Several common shortcuts are now supported in the on-canvas editor (such as Ctrl + B for bold, Ctrl + I for italics, and Shift + Ctrl + V for pasting unformatted text).
When choosing a new text color in the Text Tool options, the on-canvas preview now automatically updates as you adjust the color value rather than waiting until you commit the color change.
We’ve expanded the outline features in the text tool to support “centered” and “outer” outline directions, in addition to the existing “inner” outline.
Overwrite Paint Mode
We’ve added a new paint mode called Overwrite. It allows you to replace the color values as you paint on the canvas, without
blending the alpha values together. It has many useful applications when working with pixel art - we recommend using this paint
mode with the Pencil Tool for best effect!
Non-Destructive Filter Updates
As well as working on new non-destructive layers (vector layers, link layers, and text layers), we’ve also been working on the non-destructive filters! You can now apply filters to channels non-destructively, in addition to layers and layer groups.
Of course, you can apply filters to all non-destructive layers too
(including the new ones, Link and Vector layers), but to merge the
filters, don’t forget you will need to Rasterize them.
If you set an empty layer group to Pass through mode, then any NDE filter applied
to it will affect all layers below it. This allows you to recreate an “Adjustment Layer” workflow from other software.
You can also stack multiple filters on the same layer group to create complex effects.
The latest updates to GEGL also bring us a new Vibrance filter. This filter combines the existing Saturation and Hue-Chroma
filters to allow for selective saturation (in particular, preventing skin colors from becoming over-saturated with the rest of
the image).
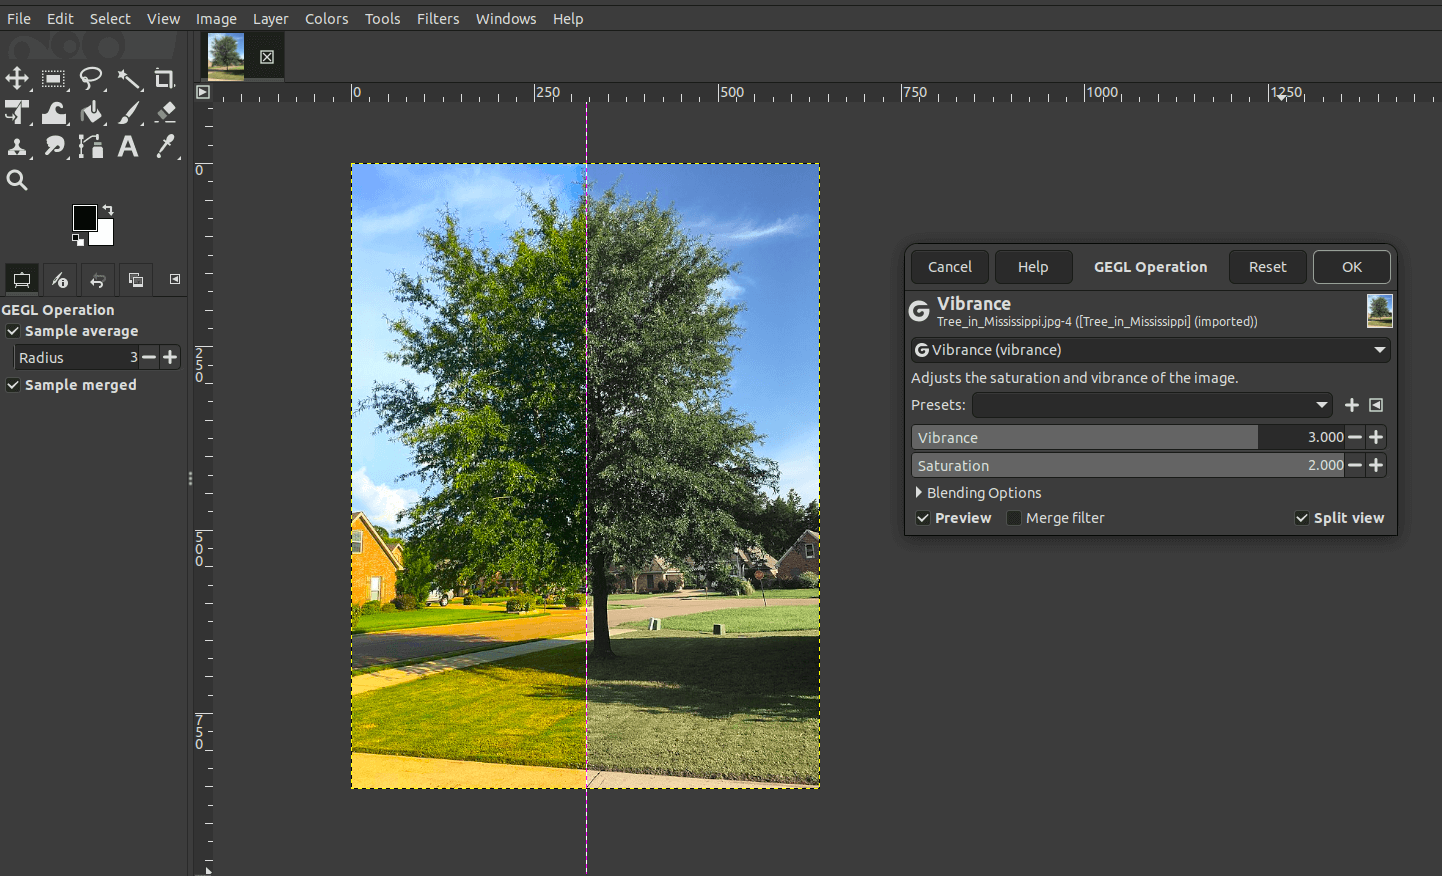
You can access Vibrance and other GEGL filters by using the GEGL Operations tool in the Tool menu, or by searching for it
via the Search Actions dialog when you press /.
Usability Improvements
Our UX design volunteers have continued their great work over the last year, and we’ve been able to implement many of their suggestions and designs. We encourage you to provide feedback on our UX site as well - if we don’t know there’s a problem, it’s unlikely to be fixed!
You could always open files as new images by dragging and dropping them onto the Tools dock - this is a common approach for multi-window mode users. Now you can also drop images on the image tab bar, which is at the top by default in single window mode.
You can now quickly switch back and forth between your two most recent tools with the Shift + X shortcut. As an example, you could alternate between using the paintbrush and the smudge tool without having to go back to the toolbox each time. This feature is also used to automatically switch you back to your last tool after using a filter (since behind the scenes, a filter is a tool as well).
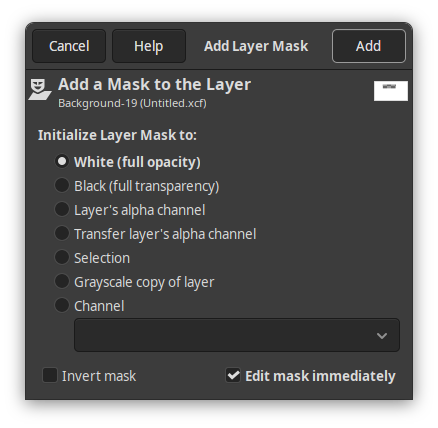
When creating a Layer Mask, there is a new persistent Edit Mask Immediately checkbox in the Add Layer Mask dialog. This allows you
to choose whether GIMP automatically makes the mask the active item on the canvas when you create a new one.
Previously, the Delete button in the Layer dock would always delete the layer, even if you had the layer mask selected. Now the button is more context sensitive - it will delete whichever one is currently active. I.e. you can now use it to delete the layer mask only.
The Welcome Dialog has received improvements to help streamline user workflows:
- It now recognizes the Ctrl + 0, 1, 2… 9 shortcuts for opening the most recent images.
- It recognizes your shortcuts to create a new image, or open an existing one (whether the respective default Ctrl + N or Ctrl + O, or your custom shortcuts if you changed the defaults).
- It also no longer appears if you intentionally open GIMP with an image (for instance, by dragging and dropping the image onto the GIMP icon).
The Flip and Shear Tools now respond to the arrow keys, similar to the Move and Rotate Tools.
-
Flip Tool: You can use the Left and Right arrows to flip the image horizontally, and the Up and Down arrows to flip it vertically.
-
Shear Tool: You can use the Left and Right arrows to shear your image horizontally, and the Up and Down arrows to do the same vertically. Like the Move tool, you can hold down Shift to shear with a larger value.
Our macOS version has improved integration with the system. The GIMP menu now contains expected options like Hide GIMP and
Show All. The Quit menu also now connects properly to the standard macOS shutdown process.
It is now possible to use multi-select in the Document History dock to open or delete multiple images at once.
The Brushes and Fonts dockables now have a new toggle for Use theme colors for preview. This changes brushes’ thumbnail colors to match
the theme - for instance, on dark mode, the brush background will become dark and the brush itself will appear light.
This should help reduce a source of glare if you have those docks open in dark mode.
| Default Colors | Theme Colors |
|---|---|
 |
 |
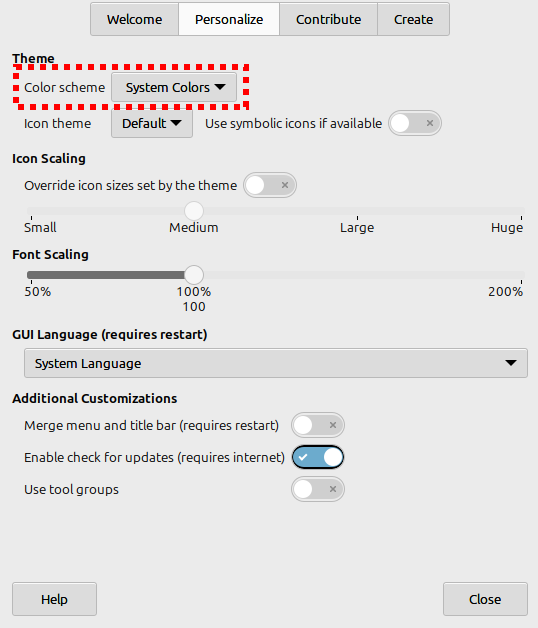
There is also a new System color scheme for Default themes. If set, it will automatically update GIMP’s theme colors to
match the current OS settings.
The Crop Tool and NDE filters now automatically add transparency to a layer when necessary, rather than requiring you to remember to do it manually.
New Image and Palette Format Support
GIMP 3.2 includes built-in support for even more file formats! These range from well-known formats like APNGs to obsolete archival formats such as Seattle FilmWorks photos, supporting your quest of old data retrieval.
For retro game developers, we now support Sony PlayStation TIM and Sega Dreamcast PVR textures.
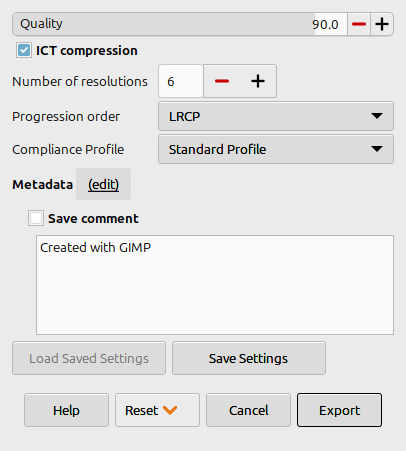
We also added export support for JPEG 2000 images, which is the standard for the digital cinema industry. This now matches our import support, which we’ve had since GIMP 2.8.
We’ve also enhanced our existing import and export features. To name a few examples:
- Our DDS plug-in now supports exporting in the modern BC7 format.
- The OpenEXR plug-in can now render Luminance/Chroma images in full color rather than grayscale.
- Thanks to our new vector layers, we can also now export SVGs and PDFs with both raster and vector layer information.
- Since GIMP 3.0, we already had support for importing Photoshop PSB (large document) files. We added export support in this release.
- We added AVCI import support as well, which is a HEIF variant (H.264 image encapsulated in HEIF).
- TIFF also had interesting improvements, including the support of various unofficial features set by third-party software as metadata.
In addition to images, we also now recognize Procreate palette swatches and have a new export option for Krita‘s .kpl palette format.
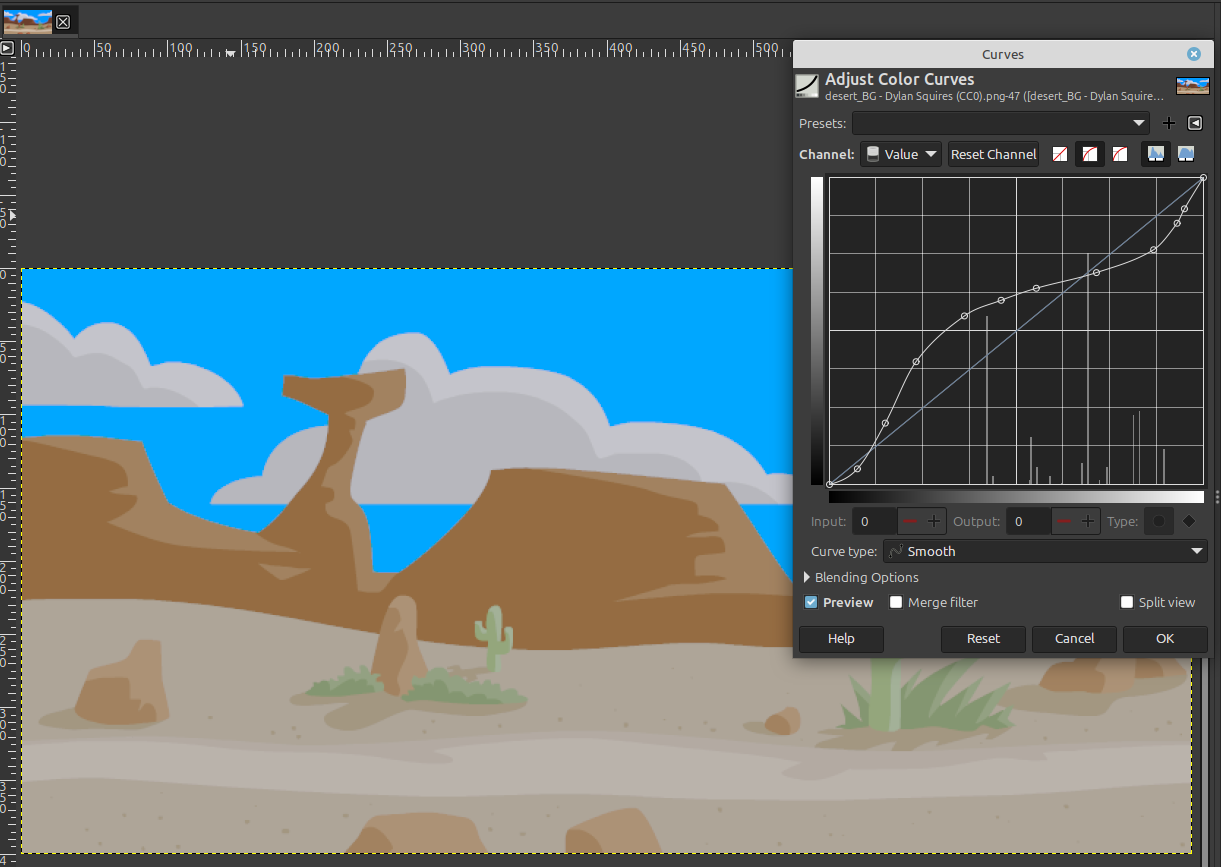
We have also added new support for Photoshop filter presets. You can import .acv and .alv presets into our Curves and Levels filters respectively to recreate your settings. You can also now load existing patterns from Photoshop from their .pat file format.
The Photoshop plug-in has also been enhanced to support importing more layer styles such as Drop Shadow, Inner Shadow, and
Outer Glow.
In addition to our existing darktable and RawTherapee plug-ins, we’ve added support for using ART for editing Camera RAW images.
As a side effect of adding support for NASA‘s .hgt.zip image format, GIMP can now load compressed images from any format that
we currently support.
Stability and Regression Fixes
GIMP 3.0 was a major, multi-year effort that required enormous changes to our codebase. That level of change meant that even though we did our best to thoroughly test before release, there were bound to be regressions and other “growing pains”. One of our focuses for GIMP 3.2 (in addition to adding new features) was to further improve the stability of the program. We’ve closed out many reported bugs from GIMP 3.0 as part of this release, and we think GIMP 3.2 will provide an improved experience as a result.
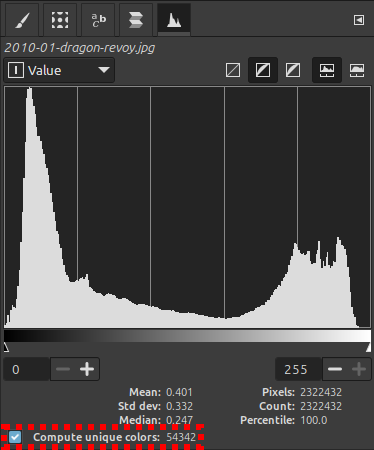
Based on your feedback, we have also restored and reimplemented features from GIMP 2.10 that were overlooked during the initial port to GIMP 3.0. As an example, while the Colorcube Analysis plug-in was largely superseded by the Histogram dock, we missed the “Unique Color” count feature. We’ve added it into the Histogram dock to restore this much-requested functionality!
Additional Features and Changes
In addition to the larger changes, there are plenty of smaller but still impactful updates for GIMP 3.2.
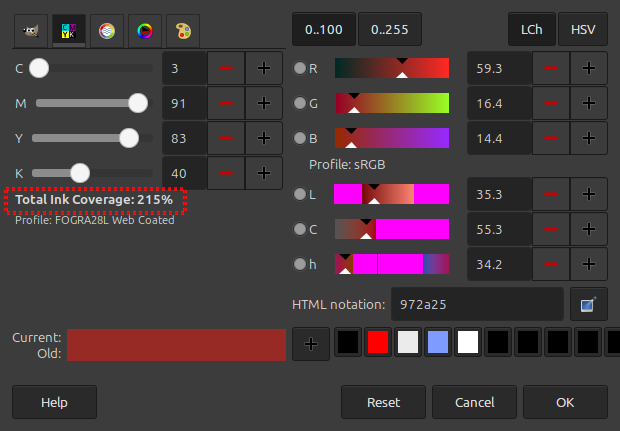
You can now see the Total Ink Coverage value for a color in the CMYK Color Selector. This is useful to know when
soft-proofing your image for printing, as your printer may have an ink coverage limit to prevent over-saturation of
the page.
A new setting Update metadata automatically in Preferences allows you to determine where GIMP automatically updates
certain metadata such as modified by dates and software creator. If turned off, GIMP will leave those fields alone.
The Paint Select Tool has been worked on to improve performance and standardize its appearance with other tools.
⚠️ Note: this tool is still in our development Playground section for now and you will need development builds to play with it.
Clipboard Patterns and Brushes can now be much larger! On modern 64-bit computers, you can create a temporary Clipboard brush or pattern up to 8192x8192 pixels, instead of the previous limit of 1024x1024.
For Script and Plug-in Developers
GIMP 3.0 brought non-destructive filters and a new GimpDrawableFilter API
for script developers to create them.
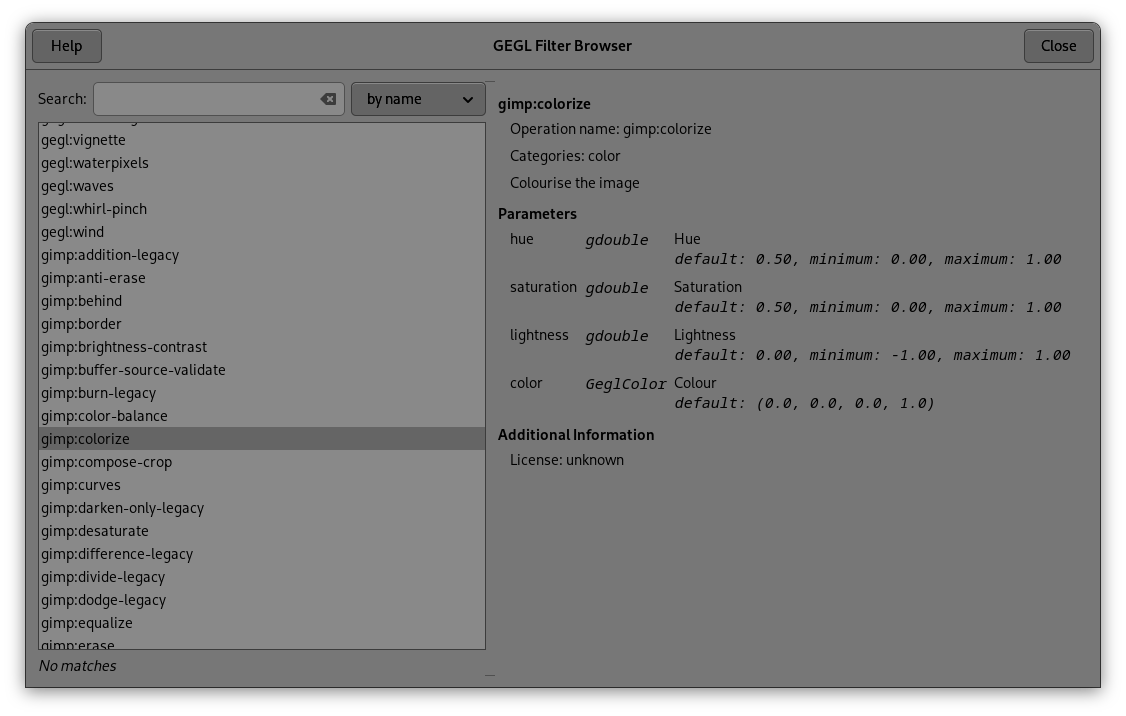
However, it was not always easy to find the names and properties for the extensive list of potential filters, especially
for third-party GEGL filters. In GIMP 3.2, we’ve added a new GEGL Filter Browser to assist! You can use it the same way
as you do the existing Procedure Browser - it will show the filter names, parameters, data types, and descriptions
necessary to add any valid filter to a layer.
We’ve also added many more features to the public API. The Link and Vector Layers can be created and edited with
GimpLinkLayer and GimpVectorLayer commands, and the text outline options are now accessible from the PDB as well.
GimpCurve objects can be created as well (primarily for use with the gimp:curves Curve filter at the moment).
For scripted painting with Emulate Brush Dynamics enabled, there are now PDB calls to get and set the fade length and repeat
type - gimp_context_set_paint_fade_length () and gimp_context_set_paint_fade_repeat () respectively.
Our auto-generated GUIs for plug-ins have some new widgets available. If you create parameters to images or paths, it will
create a pop-up selector button just like we have for layers. The gimp_procedure_dialog_get_coordinates () command will
let you combine two number properties and a unit property into a connected widget (like what you might see in the Scale Dialog).
Separately, you can also create GimpColorScales and GimpColorSelect widgets in your own plug-ins, just like the core
Color Selector dialog.
All in all, 111 new functions were added in libgimp and 14 new functions in
libgimpui. Since the API is guaranteed stable for the whole v3 series
(i.e. your GIMP 3.0 plug-ins will continue to function), no functions have
been removed, though 24 functions have been deprecated and will
therefore trigger compilation warnings. We recommend updating the code
of any third-party plug-ins.
Our of the 24 deprecated functions, 12 have direct replacements as functions:
| Deprecated function | Suggested replacement |
|---|---|
gimp_drawable_chooser_new() |
gimp_item_chooser_new() |
gimp_drawable_chooser_get_drawable() |
gimp_item_chooser_get_item() |
gimp_drawable_chooser_set_drawable() |
gimp_item_chooser_set_item() |
gimp_drawable_chooser_get_label() |
gimp_item_chooser_get_label() |
gimp_drawables_popup() |
gimp_items_popup() |
gimp_drawables_close_popup() |
gimp_items_close_popup() |
gimp_drawables_set_popup() |
gimp_items_set_popup() |
gimp_drawable_chooser_get_label() |
gimp_item_chooser_get_label() |
gimp_drawables_popup() |
gimp_items_popup() |
gimp_drawables_close_popup() |
gimp_items_close_popup() |
gimp_drawables_set_popup() |
gimp_items_set_popup() |
gimp_prop_drawable_chooser_new() |
gimp_prop_item_chooser_new() |
And for 12 other deprecated functions, the suggested replacement is to use a filter directly on the drawable of your choice. In most of these cases, it gives you much more powerful abilities (while not losing any feature, since these functions were already based on these filters):
| Deprecated function | Suggested filter replacement |
|---|---|
gimp_drawable_brightness_contrast() |
"gimp:brightness-contrast" |
gimp_drawable_color_balance() |
"gimp:color-balance" |
gimp_drawable_colorize_hsl() |
"gimp:colorize" |
gimp_drawable_curves_explicit() |
"gimp:curves" |
gimp_drawable_curves_spline() |
"gimp:curves" |
gimp_drawable_extract_component() |
"gegl:component_extract" |
gimp_drawable_desaturate() |
"gimp:desaturate" |
gimp_drawable_hue_saturation() |
"gimp:hue-saturation" |
gimp_drawable_invert() |
"gegl:invert-linear"or "gegl:invert-gamma" |
gimp_drawable_levels() |
"gimp:levels" |
gimp_drawable_shadows_highlights() |
"gimp:shadows-highlights" |
gimp_drawable_posterize() |
"gimp:posterize" |
Here is an example of applying an inverted curve as non-destructive filter, on the blue channel in non-linear space, through the Python binding:
c = Gimp.Curve.new()
c.set_curve_type(Gimp.CurveType.FREE)
x = 0
while x <= 1.0:
  c.set_sample(x, 1.0 - x)
  x += 1 / c.get_n_samples()

filter = Gimp.DrawableFilter.new(layer, "gimp:curves", "")
config = filter.get_config()
config.set_property("curve", c)
config.set_property("channel", Gimp.HistogramChannel.BLUE)
config.set_property("trc", Gimp.TRCType.NON_LINEAR)
layer.append_filter(filter)
This would have been done with gimp_drawable_curves_explicit() or
gimp_drawable_curves_spline() previously, but using the
"gimp:curves" filter allows you to choose the work space you want to
work on, but also each point type (smooth, corner) when using spline
curves, rather than freehand curves.
End of 32-bit binaries distribution
GIMP 3.2.0 is the very last version of GIMP to be distributed as 32-bit on Windows
(in other words, 3.2.2 and further micro versions will not have a 32-bit version anymore).
We’ve pondered this decision since the GIMP 2.99 development cycle as Bruno and Jernej,
the Windows packagers, requested to drop it. Supporting 32-bit architecture has been delaying
our releases due to building problems, and making the overall build pipeline take
more time than needed since it relies on WoW64 emulation and we only have few runners.
Such decision is in line with MSYS2 project from which we get packages for building on Windows,
since maintaining 32-bit (aka MINGW32 packages) has also been a technical
burden for them.
As a side effect, the ancient 32-bit TWAIN plug-in for scanning under Windows will stop being
distributed too so users should use the more comprehensive software provided by the manufacturer for now.
If you are interested in helping us write a proper 64-bit WIA plug-in for scanning, see
the Internship Ideas.
If you really need 32-bit GIMP for scanning or other reasons, we suggest to build GIMP from source
code, but be aware that the .ps1 scripts and
other build tools are not expected to work with it. We can no longer promise any support for this, unfortunately.
Translations
GIMP has received a new translation in Cornish.
Out of the 86 languages which GIMP is available in, 33 translations were updated: Basque, Brazilian Portuguese, British English, Bulgarian, Catalan, Chinese (China), Chinese (Taiwan), Czech, Danish, Dutch, Esperanto, Finnish, Galician, Georgian, German, Greek, Hungarian, Icelandic, Italian, Japanese, Kabyle, Kazakh, Lithuanian, Norwegian Nynorsk, Persian, Polish, Romanian, Russian, Slovenian, Swedish, Thai, Turkish, Ukrainian.
Next Steps on the Roadmap
As we said in the 3.0 release notes, one of our goals during GIMP 3.2’s development was to create a more streamlined process so that we could have faster releases. We’ve learned a lot as we’ve improved our workflow over the last year, and we hope to pick up the pace even further for future versions of GIMP.
A big burden has been the infamous AI bots, from which our infrastructure has had to get new protective layers, in turn affecting our own automated scripts.
Our upcoming roadmaps are, as always, publicly available. Note that these roadmaps are intended to be a planning guide for developers, not a guarantee. While a number of items on the 3.4 roadmap already have in-progress implementations (and we are very optimistic about them), we can not yet promise that each one will be included in the next minor release.
Download GIMP 3.2
You can download GIMP 3.2 from our Downloads page.
It is available on Windows, macOS, and Linux as usual. On Linux, we now have a new Snap package in addition to our existing AppImage and flatpak releases.
Reporting Bugs
Our earlier adopters and testers have done a great job reviewing GIMP 3.2 and reporting bugs for us to fix. However, we know from experience that when we make a new stable release, a much larger group of people with a variety of workflows will find at least a few things that were missed.
Please report any issue you encounter to our bug tracker – that helps us know there’s a problem so we can fix it. You’re also welcome to post requests for new features or enhancements for future versions!
Contributing to and Supporting GIMP
GIMP is a community project, and it relies on support from people like you to continue to improve. There are many ways to participate!
- If you’re a developer, we always welcome more code contributions – we’ve even marked some reports for “Newcomers” to help you ease into the codebase.
- We’re always looking for more feedback from designers to help create a better user experience.
- Other ways to directly assist with GIMP’s development include updating translations (contact directly the team coordinator for your language), writing user documentation, and creating new tutorials to assist people with using GIMP.
- You may also donate to support the existing team members.
Working on GIMP itself is not the only way to participate of course. We’re always happy to see people sharing how they use GIMP to create artistic, scientific, or even just fun images!