
GIMP
News
Docs
Tutorials
More
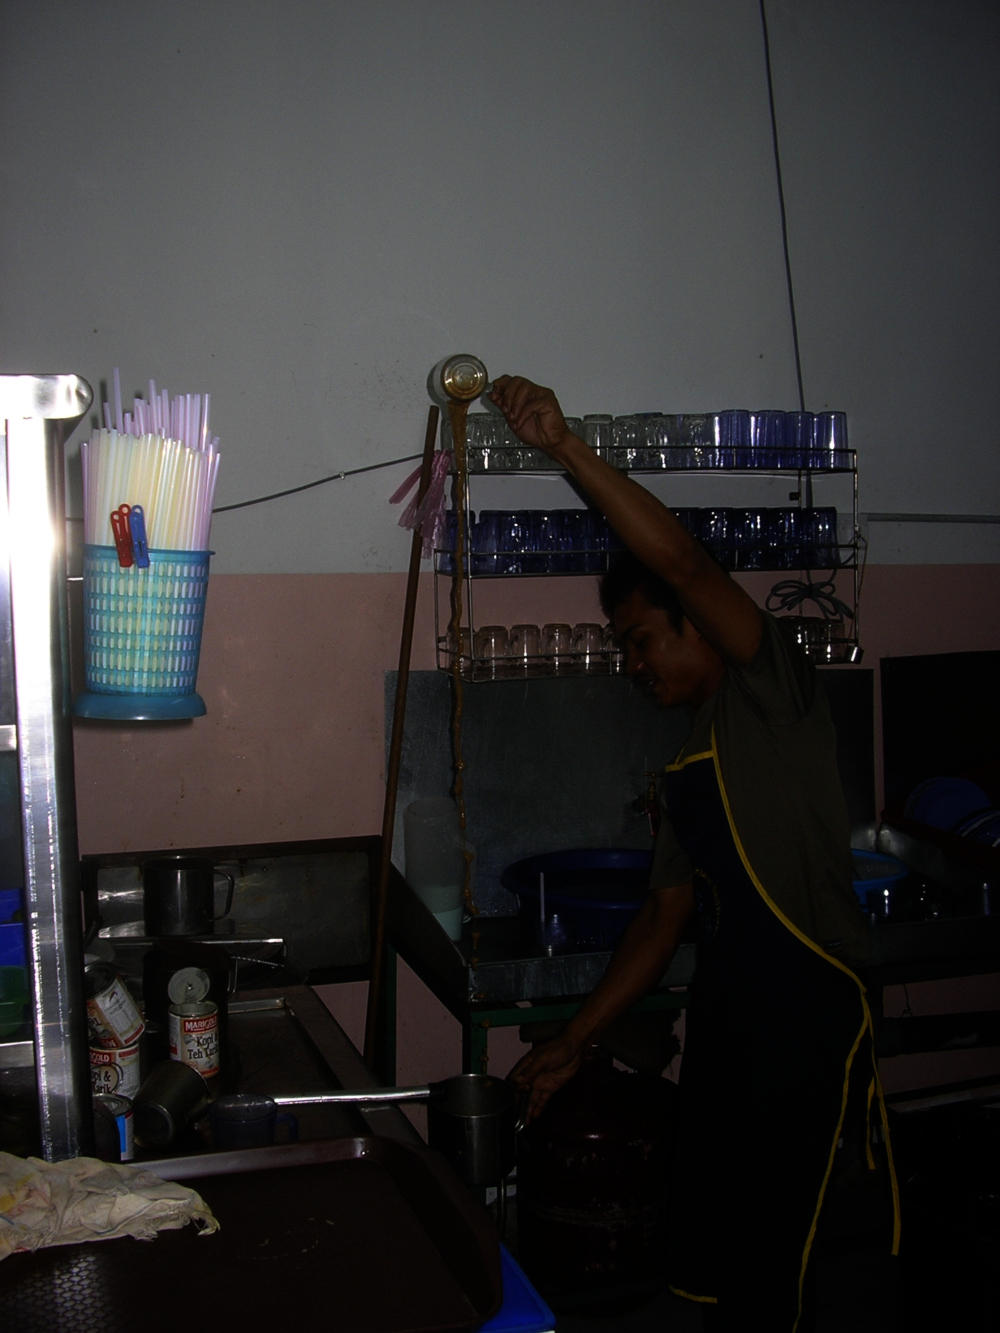
This tutorial was written using Gimp version 2.10.2 When I visited a Malaysian island cafe and ordered my usual ‘Teh Tarik’ in which tea and condensed milk are mixed by pouring them repeatedly from a height. I quickly snapped the action using a small point-and-shoot with a flash and, when I viewed the photo I was underwhelmed to say the least.
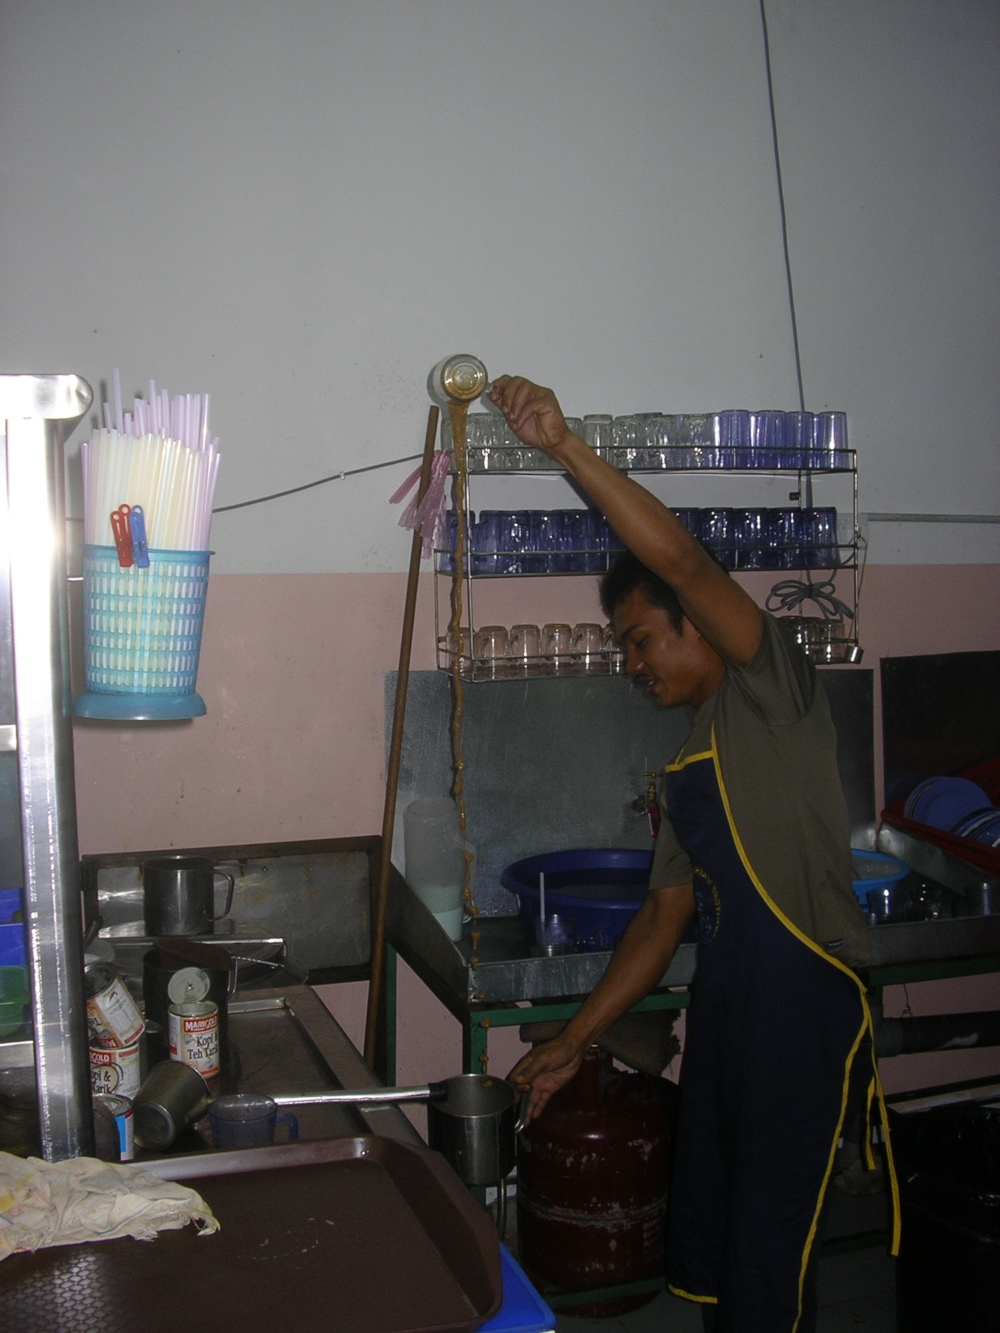
Was this to be consigned to the dustbin or was it a challenge?
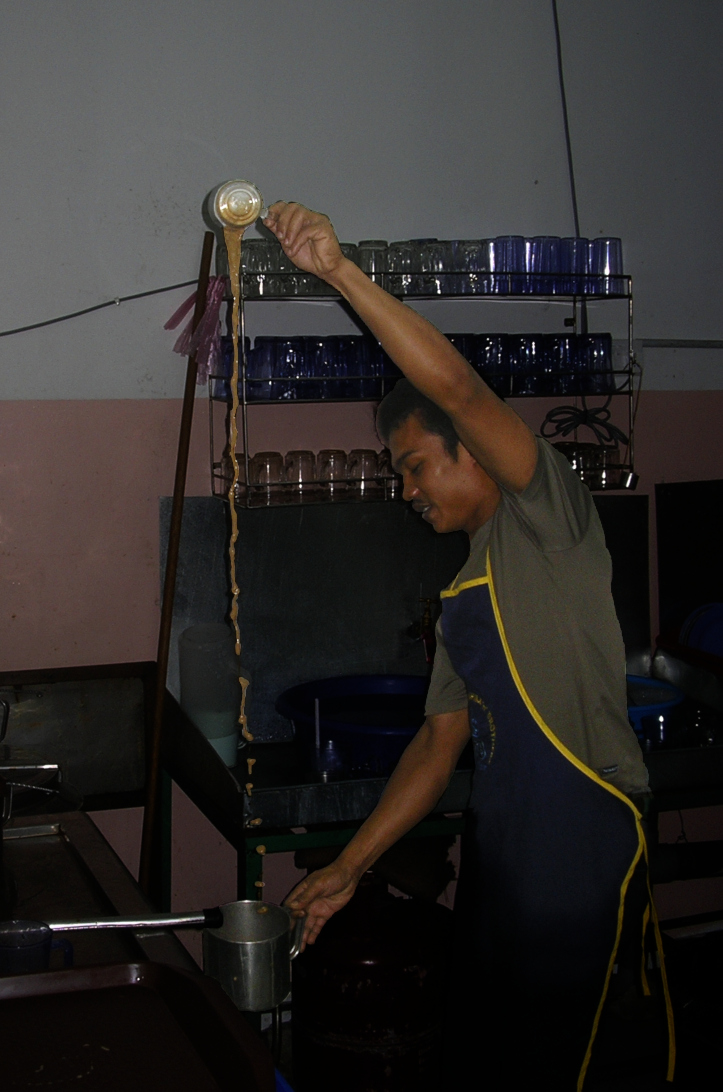
I saved it by dropping the background illumination and a crop. I dropped the background illumination on a layer set to Multiply blend mode. I then returned the figure and stream of tea to about normal via a masked layer set to Screen blend mode.
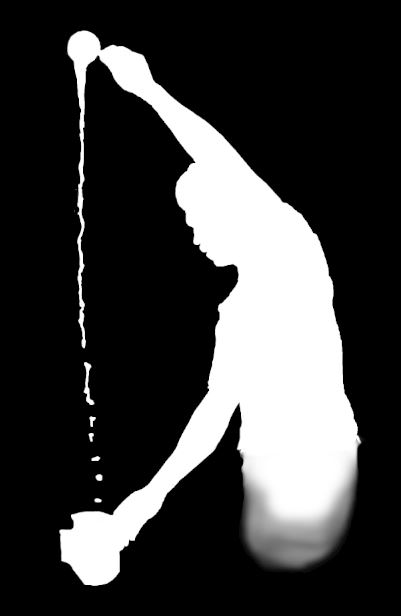
To achieve this, I duplicated the original layer twice. I set the lower new layer to a blend mode of Screen in order to set a light colour to aid the masking operation later. On the upper new layer, set a layer mask to black. I chose a hard-edged brush, zoomed in to the stream of tea using Ctrl and my mouse wheel, adjusted my brush diameter using the square-angle-bracket keys until it fitted within the tea stream, clicked on the layer mask icon to select that as a target and painted white on the mask, starting with the stream of tea and continuing around the perimeter of the person, panning the image by clicking and dragging my mouse wheel. Because the layer below is in blend mode Screen, the layer mask painting showed up brighter. If I made a mistake and painted over the background, I pressed the X key to swap colours to black, and painted over the mistake. Once I had the outline painted I Alt-clicked the layer mask to view it and filled the perimeter with white using the bucket fill tool and a brush. I also chose to fade-out the white below his waist by painting with the soft-edged airbrush with a low flow.
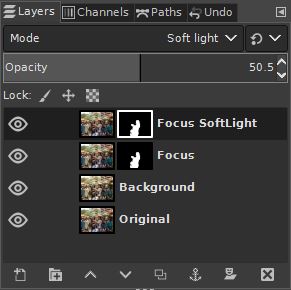
Once I was satisfied with the masking of the person and tea, I changed the layers to be as in the image below:
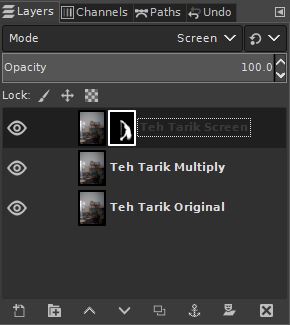
The second layer, which was blend mode Screen to aid in mask painting, now became blend mode Multiply. The layer with the mask now became blend mode Screen.
Multiply ignores white and makes dark things darker. The Multiply layer gives a darkened background in order that it is less noticeable.
The Screen layer has a mask that shows only the person and the tea. While Multiply ignores white and makes dark things darker, Screen ignores black and makes light pixels get lighter. Accordingly the person and the tea returned somewhat to normal but with a slight lightening in the brighter pixels. Should you wish to have the figure even brighter, you may duplicate the masked layer, although this was not needed in this case. Duplicating this layer is also needed if you wish to try various other blend modes or treatments in order to adjust the colour, contrast or tone of the figure.
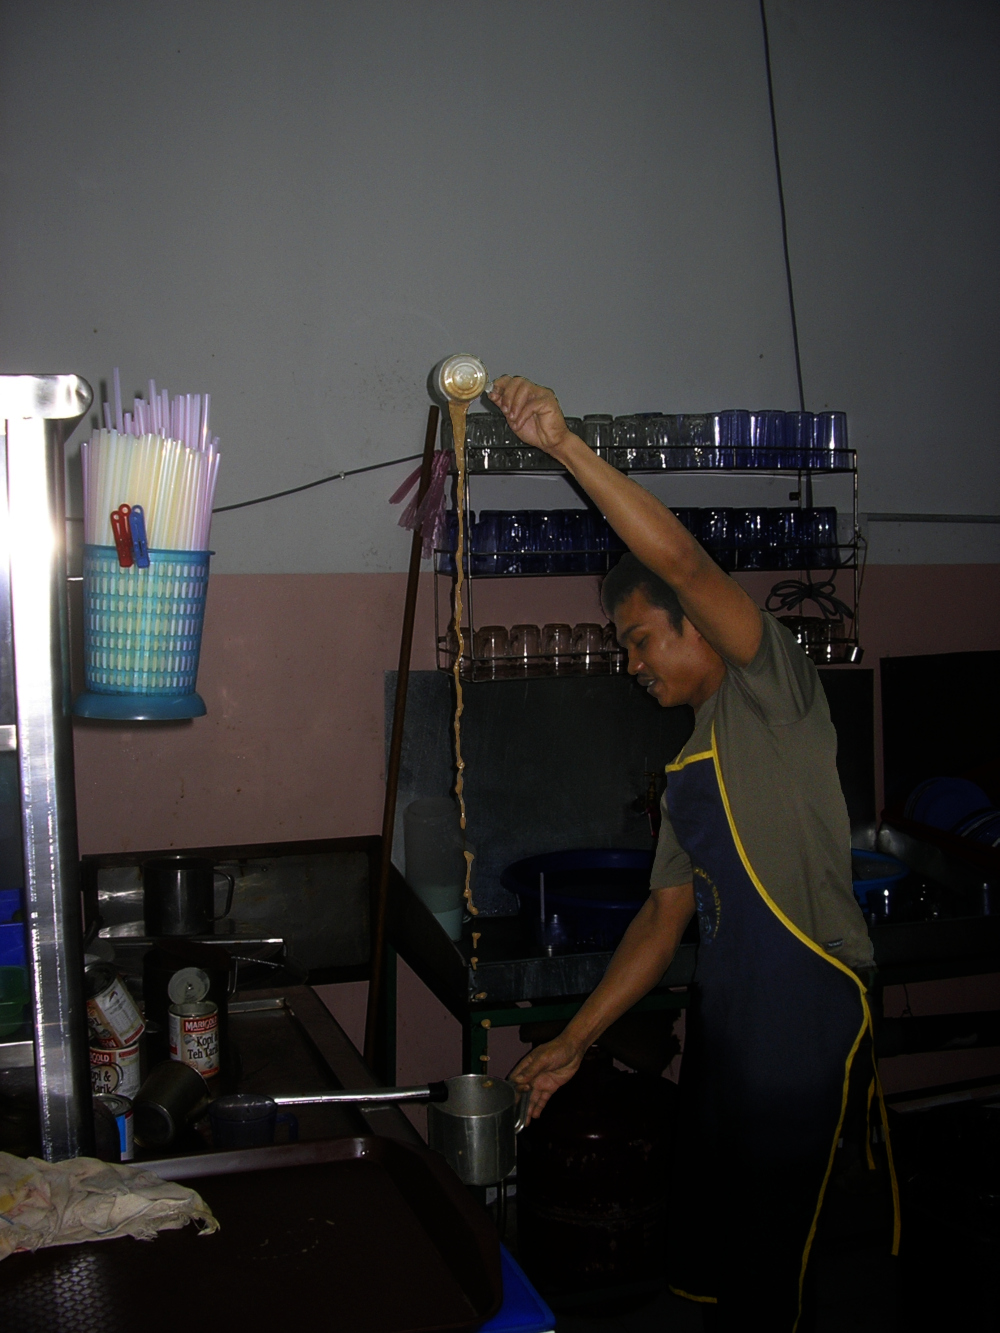
Now all that is needed is a crop and you’re finished.
A handy rescue!
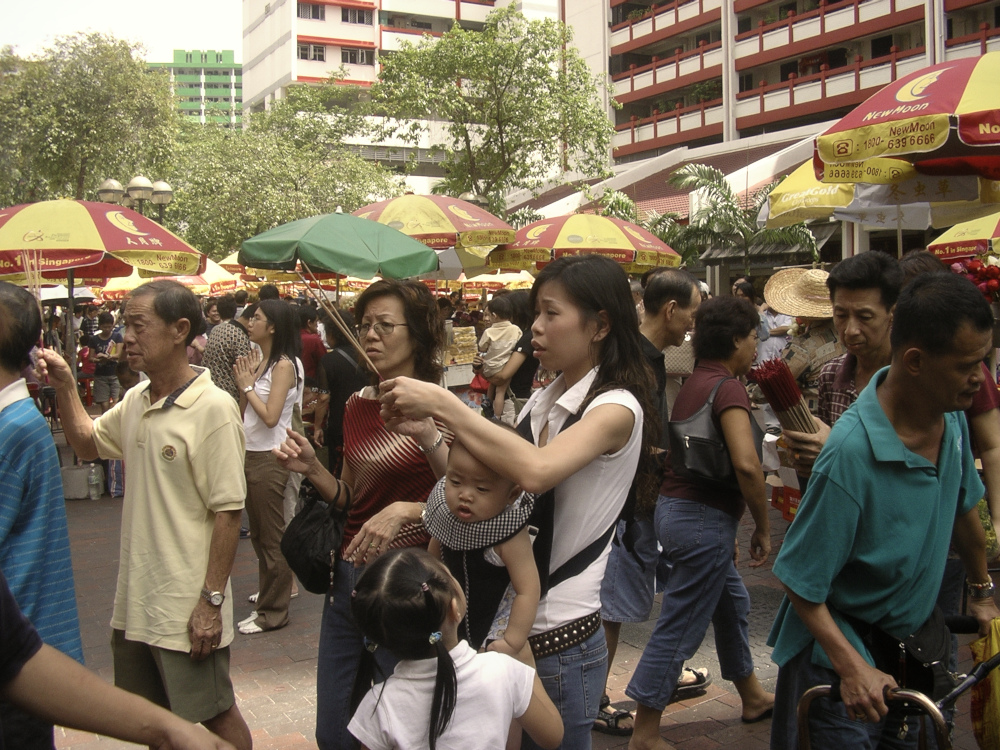
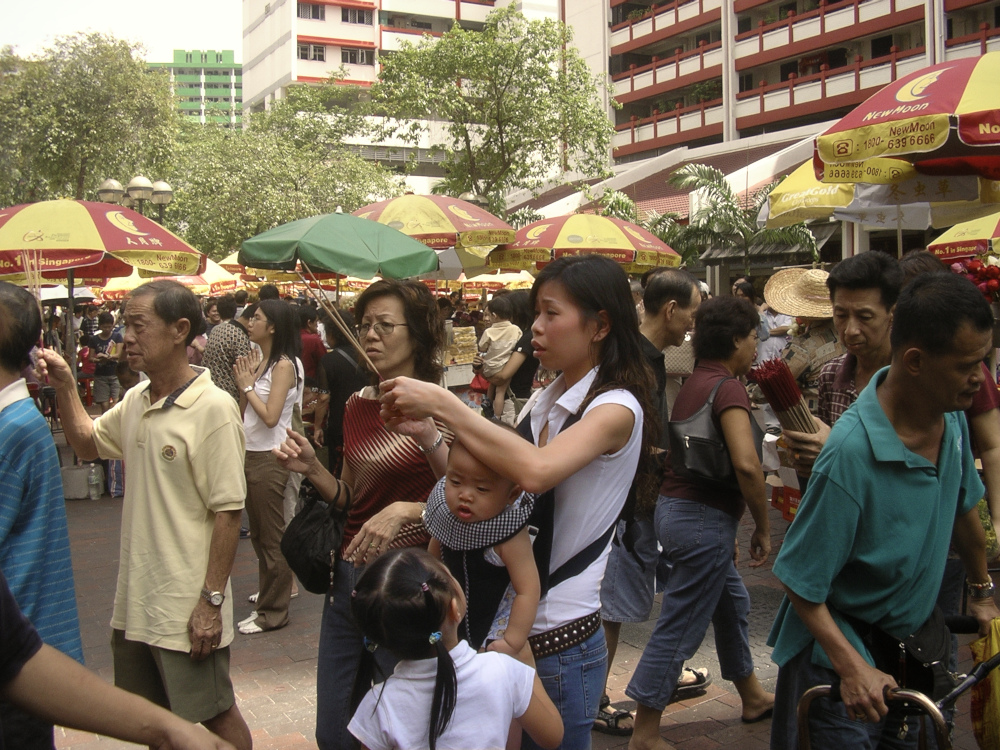
The next photo calls for a similar masking technique to the previous - On a festival day in Singapore, outside a Chinese temple, I was watching a devout woman with her children and rapidly took a photograph before moving on to some other scene. When I eventually looked at the resulting photo I could see it did not reflect what I saw due to the confusion of people in the scene.
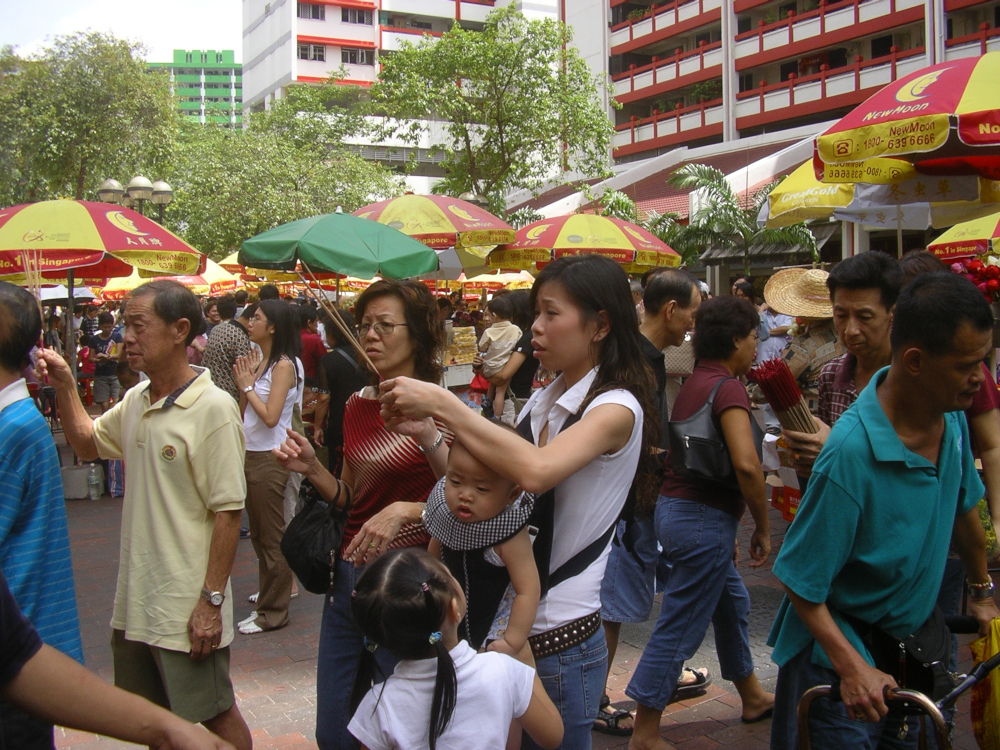
In my mind’s eye, I had seen the woman and her children as a focal group and the others faded into the background - thus the need to re-create what I had seen in my mind’s eye. This technique is to treat my chosen group differently to what I choose to be my background.
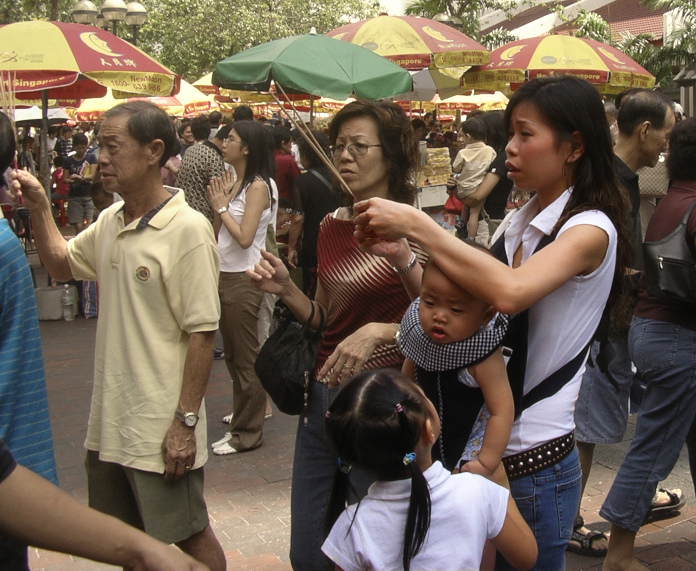
Above is the simplest of these techniques, where my crop lessens the number of people and the woman and children are in heightened contrast to my background which has less colour and less saturation. To achieve this result, I am firstly going to change the appearance of a layer to serve as the background then isolate the focal group in the layers above this. I will eventually have a stack of layers, from the bottom up, the original, a background and two of the focal group at the top of the stack.
To make a start, forget about the two upper layers at this stage, they’ll come later. I duplicated the original layer and renamed layer two Background. I now had two layers in my image. Now I played around with various ways of introducing a difference in order to have this layer recede into the background or, in some way, be differentiated from the focal group. I tried Colours > Hue-Chroma with the Hue set to 30 and the Chroma to -6, Hue introducing a yellowish tinge and the reduction in Chroma lead to a desaturation. I tried Brightness-Contrast and lowered the Contrast. I tried Colours > Colorize and set the colour to bf9740 then reduced the opacity of the layer to 50% allowing the original layer beneath to partially show through. As one experiment, below, I chose Colours > Desaturate > Sepia and used a strength of 0.5 then lowered the opacity to 70% to allow the original, below, to show through.
This subdued the colours of the whole scene quite well. To introduce the focal group I duplicated the original layer and moved it to the top and gave it a layer mask coloured black. With the black layer mask the top layer makes no difference until you paint with white onto the layer mask so, with a soft-edged brush of a diameter that covered the woman’s right arm, I clicked on the layer mask icon to select it as a target and painted over the perimeter of the focal group in white: The woman, and the two children. I chose a small diameter hard-edged brush for the incense sticks, clicking once at the base and shift-clicking once at the top for each. I then Alt-clicked the layer mask to make it show, then filled-in the perimeter with white using the bucket fill tool and then a paintbrush.

If you blend a layer with itself in either Overlay mode or the softer Soft Light mode, you effect an increase in contrast. The lights become lighter and the darks become darker. To make the focal group even more prominent, I duplicated the top-most layer and set the top layer to a blend mode of Soft Light to increase contrast and set its opacity to 50% to lessen the effect. Alternatively, I could have applied a mild S curve to the focal group layer, but adding a Soft Light layer gave me the opportunity of adjusting the effect (via opacity) later.
The final thing to do was to apply a suitable crop which further reduced the confusion of people in the shot leading the viewer to the focal group of the composition.
I tried sharpening the focal group layer: I duplicated the focal group layer and applied the High Pass filter and changeded the blend mode to Soft Light, Overlay or Grain Merge but, as I was working on an image less than the original size for this tutorial, I didn’t leave this layer in as it emphasised the pixellation too much.
There are so many different ways of treating the background layer that I’m sure some will spend quite some time coming up with schemes that better suit them. In Filters > Artistic there is Soft Glow and another may be to turn the background into a coloured pencil-style sketch using G’MIC B&W > Pencil combined with Colors > Sepia and adjusting the gamma then fading this into the background using a layer mask.
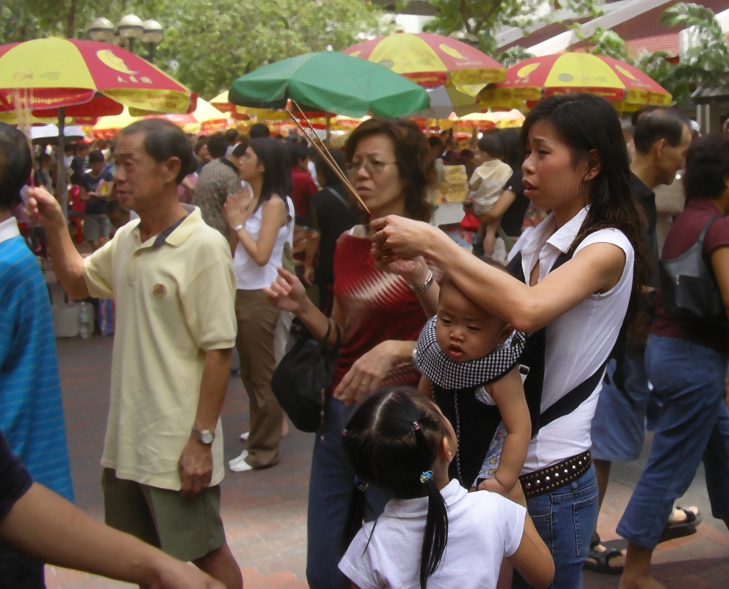
One classic alternative is to blur the background. The background, above, was blurred in G’MIC-Qt using Repair > Smooth Median with a radius of 4 and Threshold of 0 and seems to me to bring the focal group to the fore. Having the background and focal group as separate layers allows you to experiment further as you discover new ways to change images. Happy experimenting!
In these two photos we have seen the use of three blend modes, Screen, Multiply and Soft Light, a soft version of Overlay. These are the three most basic blend modes of the three most important blend mode groups which we may as well explore a little. Identify these three blend modes in Gimp’s menu. I’ve taken the following comments from my notes which may be a paraphrase from the person I learned from, Dan Margulis, apologies Dan.
Screen is the basic representative of the lighten group which includes about 4 others. If you want to lighten something, start with Screen. Screen ignores Black. Light pixels get lighter, dark pixels are ignored. It’s like aiming two projectors at the same screen.
Multiply is part of the darken group which includes about four others and is the opposite of Screen. If you want to darken something, start with Multiply. It ignores white and makes things darker. If you have any bright pixels Multiply blend mode just ignores them. It’s like sandwiching two 35 mm slides together (if you are familiar with slides).
Overlay is the representative of the contrast group along with its milder counterpart, Soft Light and about 5 others, and is a combination of Screen and Multiply. It ignores 50% grey, makes light things lighter and dark things darker thus increasing contrast.
The blend modes that go together with these three, such as Dodge and Burn may be thought of as variations of these three basic representatives and all have their own specific characters and functions which are definitely worth exploring. Screen, Multiply and Overlay will not cause clipping but some blend modes, for example: Dodge, Addition, Burn, do cause clipping and should be watched for in light or dark areas. Clipping or blowing-out means taking a pixel colour or tone value to pure black or white. This isn’t good as pure black or white parts of an image contain no detail.
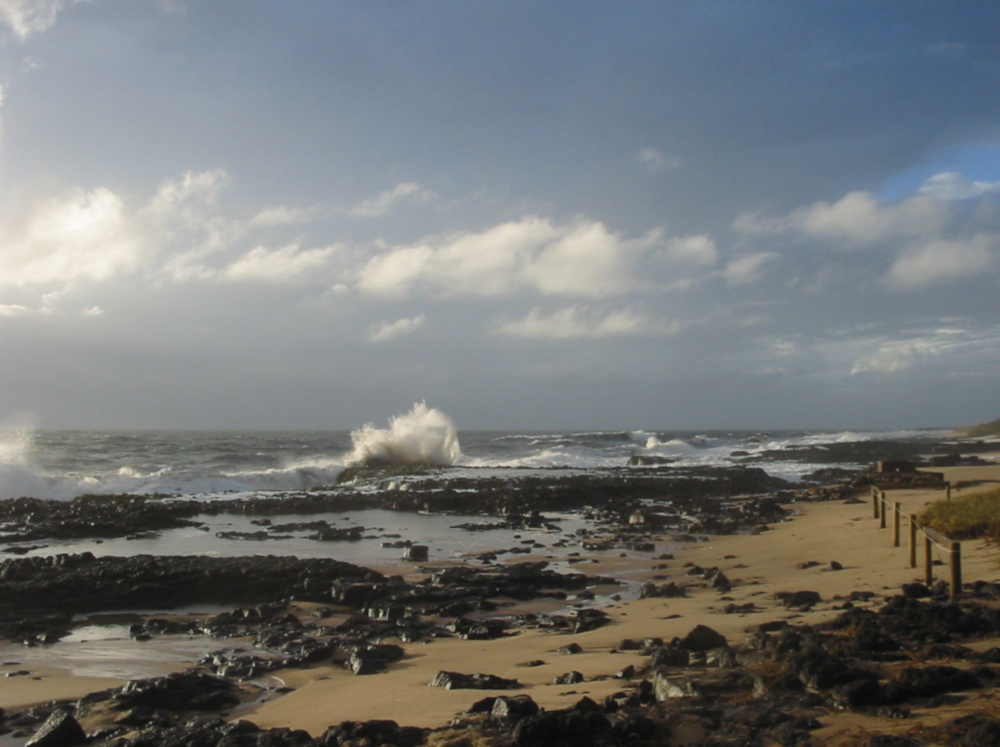
During a break in rain during a storm at our local beach in Bunbury Western Australia, the sun briefly showed and I took a shot of the sea by the rocks in the storm’s winds. The usual story is my photo did not reflect what I had experienced taking it - it all looked a bit subdued. Following our theme for this tutorial, the idea is to mask and apply a blend mode but this time two layer masks to accommodate two different blend modes. Here is the ‘Before’:
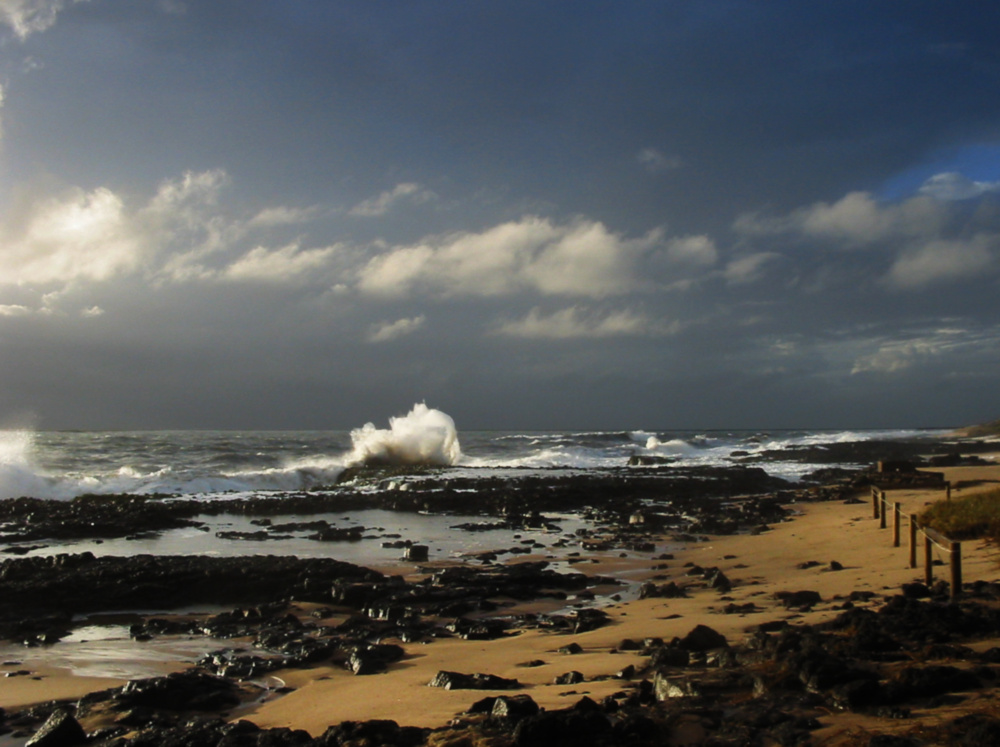
Here is the ‘After’:
I began by duplicating the layer and running through a range of blend modes by selecting one mode then pressing the down arrow key to go to the next, looking at what each mode did to the sky and to the sea and land.
What I found was that Overlay did not work for the sky by did so beautifully for the land, bringing out the texture of the rocks against the sand and heightening the white of the spray. I also found that Multiply worked well for the sky, darkening it into the glowering sky I remembered.
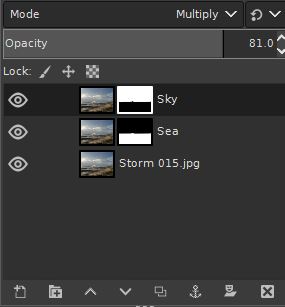
I then left the blend mode of the duplicated layer at Multiply (in order to provide a visual difference when masking), added a white layer mask and began painting black onto the mask to cover the sea. I began at one side and painted a line under the horizon by choosing a small enough brush, clicking once, moving the brush a few centrimetres then Shift-clicking under the horizon again. This procedure draws straight lines between the two clicks as long as Shift is down. I renamed this layer Sky. I then duplicate this layer and renamed it Sea. I clicked the layer mask, went to Colours and chose Invert and this inverted the layer mask so the black portion covered the sky.
I set the Sea layer to Overlay.
I noted that, at the horizon, I had a strip of lighter tone which drew attention to itself. Experimenting, I found that I could adjust the mask of the sky to remove it and did so. I then adjusted each of the layers above the original to 80% opacity as this gave me the intensity of effect I wished.
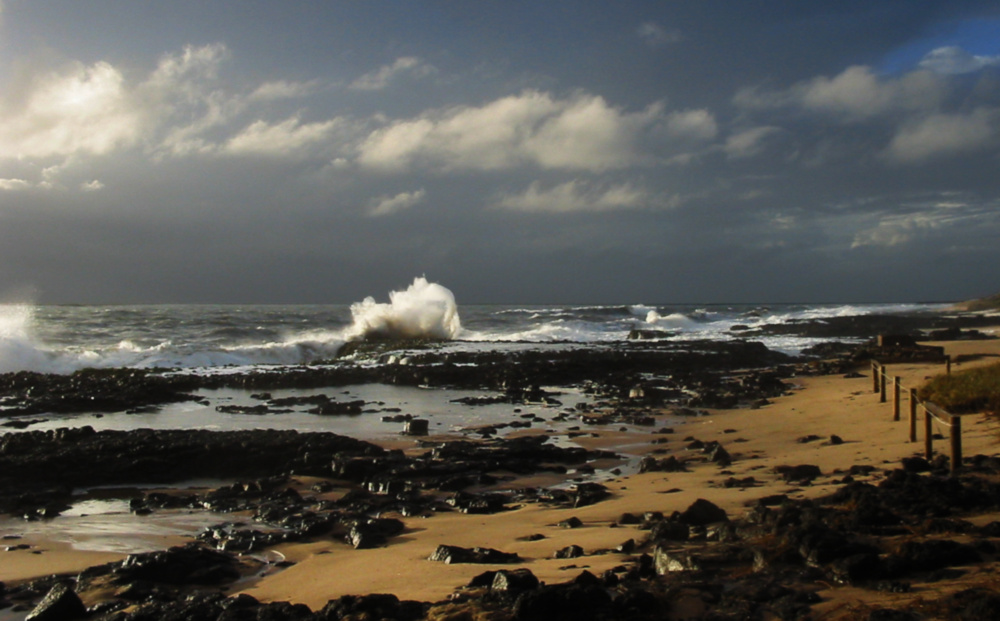
The final cropped photo of the storm:
I do hope you benefited from these tutorials, I wish you well.
Tutorials for Gimp by John Brewer
 FocusGroup
by John Brewer is licensed
under a Creative
Commons Attribution-ShareAlike 4.0 International
License.
FocusGroup
by John Brewer is licensed
under a Creative
Commons Attribution-ShareAlike 4.0 International
License.