The Print Plugin

Main Window
Figure 1. The Main Window

The main window is divided into five panes:

Preview
The Preview pane contains a positioning widget that allows interactively positioning the output on the page. It contains an outer border, representing the sheet of paper; an inner border, representing the printable area of the printer; an arrow, pointing to the top of the page (the end that’s fed into the printer); and a black rectangle, representing the position of the image on the page. The image can be moved around on the paper. When the first (left) button is used, the image is moved in screen pixels; when any other button is used, the image is moved in points[[1]](#FTN.AEN19). The arrow resizes depending upon the media size chosen; the shaft of the arrow is always equal to one inch on the output.
Printer Settings
The Printer Settings pane contains a dropdown menu for selecting a printer to print to. There is a special “printer” named File that allows you to choose a file to print to, rather than a printer queue. The Setup box to the right allows specification of a printer type, a PPD file[[2]](#FTN.AEN29), and the command to be used to print. Each distinct printer in the Printer list can have different settings applied to it. Below that is a combo box allowing choice of media size. The choices are constrained to those that the printer supports. Below that are dropdown menus for choosing media type (what kind of paper), media source (what input tray), ink type, and resolution. All of these settings are printer-specific.
Print Setup
Figure 2. The setup
Position
The Position pane contains various widgets to place the image on the paper. These widgets work in conjunction with the Preview pane. At the top left of the pane is a button to center the image on the paper (not on the printable area). To its right is a button group that allows choosing English (inch) units or metric (centimeter) units. Below these are four boxes that allow entry of the left, top, right, and bottom of the image. These positions are relative to the top left of the paper[[3]](#FTN.AEN48). There are two additional boxes that allow specification of the right margin and bottom margin if you prefer; these are relative to the bottom right corner of the paper. Any of these may have values entered into them; the preview image will be moved appropriately.
**Note:** These entries do not resize the image.
Finally, there is a pick box for orientation (landscape or portrait). There is an Auto mode that picks the orientation that yields the orientation that best matches that of the image to be printed.
Scaling
The Scaling pane contains a slider that allows scaling of the image. The image can be scaled in either percent of the printable area (NOT the page in this case) or pixels per inch (PPI) via a radio button below the slider. PPI allows matching image resolution to printer resolution. The image may be scaled using either method to between 5 and 100% of the imageable area. It is not possible to crop with the Print plugin. In Percent mode, the image is scaled so that neither axis will be longer than the percent of the printable area specified. For example, if you print an image at 20%, it will be possible to tile the image 5 times on one axis and at least 5 times on the other. To the right of the radio button is a button called Set Image Scale. This sets the scaling to PPI, and sets the resolution as closely as possible to the resolution stored in the image. To the right of the Set Image Scale button are two boxes that allow entry of width and height of the image. These set the scaling mode to PPI. Specifying one automatically sets the other, and the image is repositioned as needed to prevent it from falling off the edge of the page.
Image Settings
The Image Settings pane allows choice of Line Art, Solid Colors, Photograph, or Monochrome image type. Line art or Solid Colors should be used for graphics containing mostly solid areas of color. They’re very similar to each other. Photograph mode dithers more slowly, but produces more accurate colors. Finally, Monochrome mode can be used to print absolute black and white very quickly. To the right of these four radio buttons is a button called Adjust Color. This pops up a new window that controls various output quality settings. That will be described separately. Finally, there is a choice of Black and White and Color output.
Action Buttons
The last pane contains four action buttons: * Print and Save Settings — immediately print the image (or, if the File printer is chosen, display a file selection window to pick the output file), and save all current settings for all printers. * Save Settings — immediately save the settings, and continue working in the Print plugin. * Print — immediately print the image (or, if the File printer is chosen, display a file selection window to pick the output file), but do not save settings. * Cancel — immediately quit without saving or printing.
## Adjust Color 
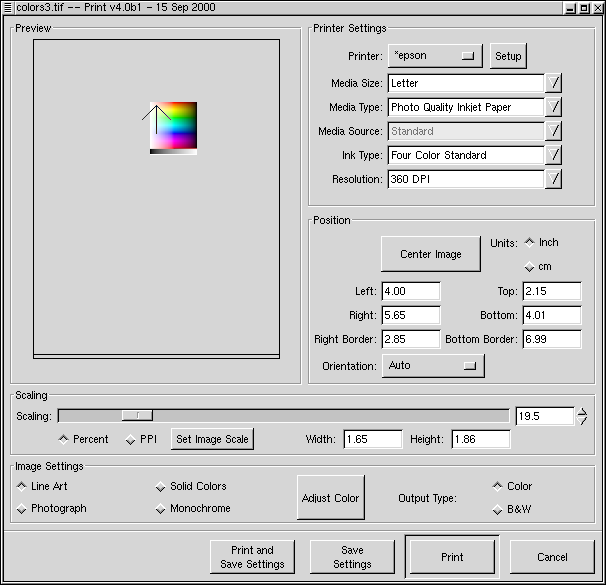
The Adjust Color button button pops up a non-modal dialog that allows adjustment of various parameters related to the print quality. These are independent of the controls within the GIMP itself and only affect the print.
**Figure 3. The Color Settings**
![](print-color.png)
At the top of the window is a thumbnail of the image that changes to reflect the color settings of the image. This enables you to get an idea of how the image will print out as you adjust settings. Below that there are eight sliders:
Brightness (0-2.0, default 1.0)
adjust the brightness of the image.
Contrast (0-4.0, default 1.0)
adjust the output contrast.
Cyan, Magenta, Yellow (0-4.0, default 1.0)
adjust the cyan, magenta, and yellow in the output. These should not normally need to be adjusted very much; even very small adjustments can go quite a long way to restoring color balance..
Saturation (0-9.0, default 1.0)
adjust the color brilliance (saturation) of the output. Saturation of 0 means pure gray scale, with no color. Saturation of 9.0 will make just about anything but pure grays brilliantly colored.
Density (0.1-2.0, default 1.0)
adjust the density (amount of ink) in the print. The density is automatically corrected for the particular printer, resolution, and in some cases paper choices. If solid black in the input is not solid in the print, the density needs to be increased; if there is excessive ink bleed-through and muddy dark colors, the density should be decreased.
> **Note:** that the density will not increase beyond a certain amount no matter what the slider is set to.
Gamma (0.1-4.0, default 1.0)
adjust the output gamma. The gamma value is automatically corrected for the choice of printer; this is used if you believe the automatic setting is incorrect.
Dither Algorithm
There is also a selection box for the dither algorithm to be used. There are currently seven choices: * Adaptive Hybrid usually yields the best output quality; it chooses a modified Floyd-Steinberg error diffusion algorithm or ordered dithering depending upon the image characteristics. * Ordered uses a pure ordered dither. It generally yields excellent quality for simple black and white or four color printers without variable drop size or drop modulation; it is not recommended if high quality is desired on six color printers. It is considerably faster than Adaptive Hybrid. * Fast also uses a pure ordered dither, but uses a very simple black model and makes no attempt to handle multi-level (6-color, variable drop size, or drop modulation) at all cleanly. It is substantially faster than Ordered dither. The quality tends to be quite poor except on simple four color printers. On three color printers, quality is probably competitive with anything else. * Very Fast is similar to Fast, except that it uses a very simple dither matrix that can be looked up much more quickly than the matrix used in the Fast dither. For simple pure black and white images dominated by horizontal and vertical lines, this may actually yield the best results; for other types of image, the quality will be poor. * Adaptive Random is similar to Adaptive Hybrid, except that the modifications to the Floyd-Steinberg algorithm are slightly different. This is slower than Adaptive Hybrid on most systems. For some images the quality may be better than Adaptive Hybrid, but generally Adaptive Hybrid should yield slightly superior images. * Hybrid Floyd-Steinberg uses the modified Floyd-Steinberg algorithm of Adaptive Hybrid on the entire image. Generally, the results are poor in pale regions. * Random Floyd-Steinberg uses the modified Floyd-Steinberg algorithm of Adaptive Random on the entire image. Generally, the results are poor in pale regions.

Notes

[[1]](print.html#AEN19) the output resolution of the plugin
[[2]](print.html#AEN29) for Postscript printers
[[3]](print.html#AEN48) again, that’s relative to the paper corner, not the printable area, which is usually smaller